

Email marketing is still one of the most effective ways to convert visitors into paying customers. According to recent studies, businesses earn an average of $42 for every $1 spent on email marketing, making it a cornerstone of digital growth. But the real magic happens when your email automation platform seamlessly integrates with your website.
That’s where MailDrip integration comes in. MailDrip is designed to help you capture leads, nurture subscribers, and run automated drip campaigns without unnecessary complexity. Whether you’re running a blog, a WordPress website, or want to trigger forms inside pop-ups, MailDrip makes it possible.
In this article, we’ll walk through step-by-step how to integrate MailDrip into your site. We’ll cover:
• How to add MailDrip forms to blog pages.
• How to connect MailDrip with pop-ups for lead capture.
• How to set up WordPress integration with MailDrip.
• Options for both non-technical users (HTML snippets) and technical users (JavaScript + API).
By the end, you’ll know how to get MailDrip running smoothly, no matter your level of technical expertise.
RELATED POSTS:
- 15 COMMON EMAIL MISTAKES TO CORRECT NOW
- 8 BEST STRATEGIES TO REDUCE EMAIL UNSUBSCRIBE RATES
- APPLICATION OF AUTOMATED LEAD NURTURING IN EMAIL MARKETING
- HOW TO EFFORTLESSLY SEND MASS EMAILS TO YOUR EMAIL LIST
Why MailDrip Integration Matters in 2025
Modern consumers expect personalized communication. If someone reads a blog post about productivity hacks, they’re more likely to subscribe to a newsletter about time management tips. If they sign up from a pop-up while browsing your product page, they’re probably interested in updates or special offers.
With MailDrip integration, you can:
• Place lead capture forms at strategic touchpoints on your site.
• Automate drip campaigns tailored to user behavior.
• Sync directly with your WordPress blog without coding headaches.
• Customize everything to match your brand identity.
This flexibility makes MailDrip a powerful tool for startups, eCommerce businesses, and content creators who want more than just a static email list.
MailDrip Integration Options
1. For Non-Technical Users: The HTML Snippet Method
If you don’t know how to code, the good news is that MailDrip provides ready-to-use HTML snippets. These are small blocks of code you can copy from your dashboard and paste into your website wherever you want the form to appear.
Step-by-Step (HTML Snippet Integration):
1. Log in to MailDrip and navigate to Campaigns → Create Drip Campaign.
2. Select Form Integration → Get HTML Snippet.
3. Copy the code provided.
4. Paste it into:
• A blog post’s HTML editor (e.g., after the introduction or at the end of the article).
• A pop-up builder like BeeTcore, so the form appears inside a modal.
• A WordPress page or widget using the Custom HTML block.
Customization Tip:
You can tweak fonts, button colors, or background styles directly in the snippet or by applying your site’s CSS classes. This ensures the form looks like part of your brand, not an afterthought.
2. For Technical Users: JavaScript + API Wrapper
If you want more control over your forms and data handling, MailDrip supports JavaScript integration.
Take Your Emails to the Next Level
MailDrip helps you automate your outreach, nurture leads, and grow your brand with ease. Send the right message at the right time—without the stress.
Sign Up FreeNo Card Required
With this method, you design your own form and use a lightweight JavaScript file to connect it to MailDrip’s API. This gives you complete freedom over design, while still letting MailDrip handle the heavy lifting of data storage and drip campaigns.
How It Works:
• You host the form on your site.
• A JavaScript wrapper exposes functions like MailDrip.pushLead().
• When a visitor submits the form, the function makes a POST request to
Step-by-Step Guide to MailDrip Integration Process
- Login in to the maildrip, Navigate to campaigns and select the campaign (or create one) that should retrieve the contacts from the integrated form.

- On the campaigns detail page, click “Forms”
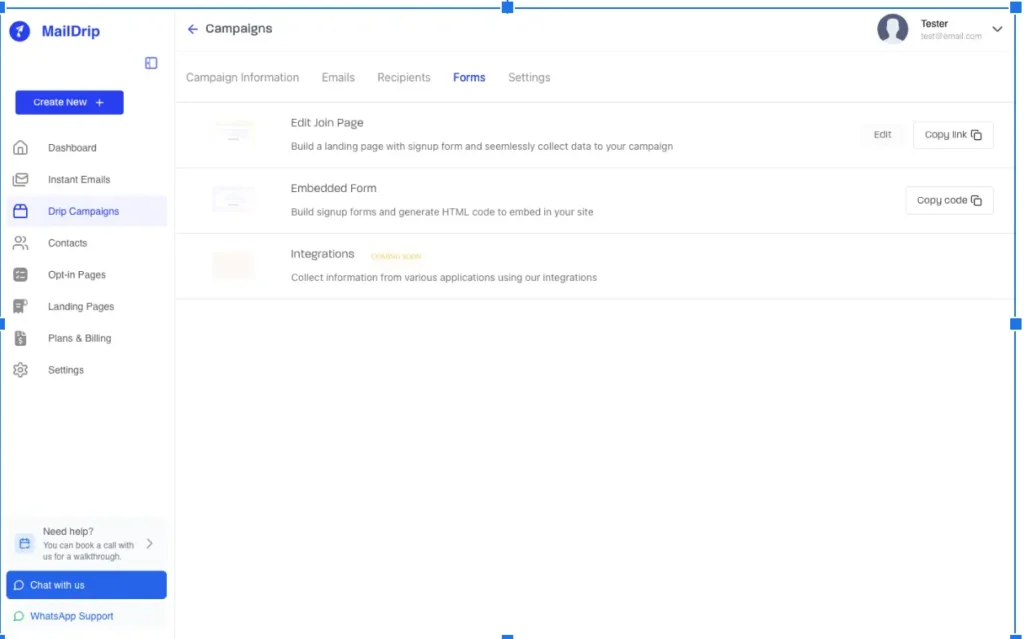
- On the forms tab, click on “Copy code” on the Embedded form row. A popup with instructions is displayed
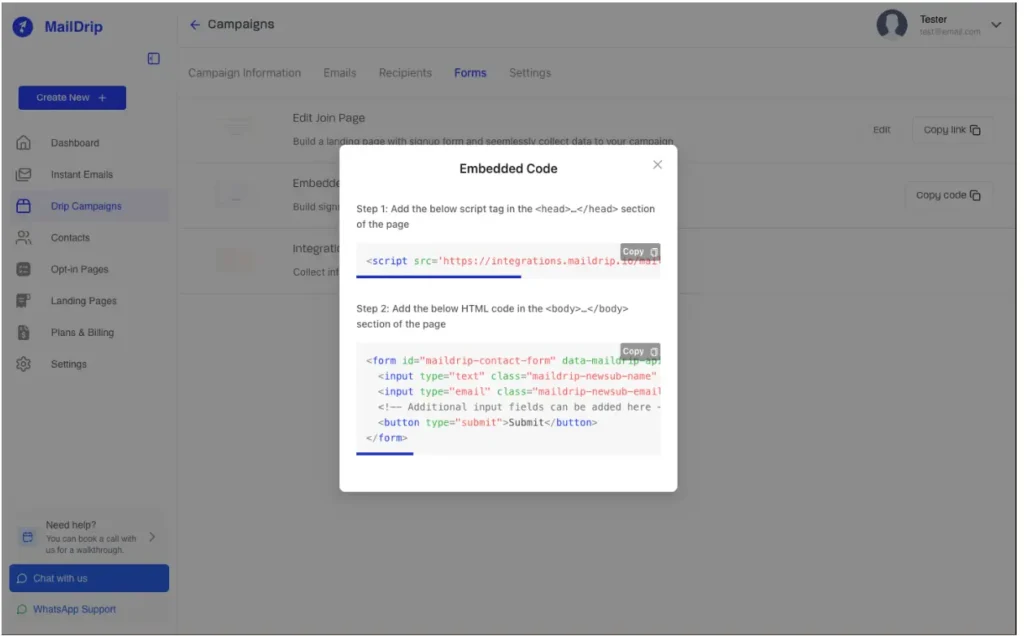
- Copy the script tag <script src=’https://integrations.maildrip.io/maildrip_html.min.js’ type=’module’></script> from step above and correctly place this into the root head tag of the webpage where this form resides
- A form html element with the following COMPULSORY attributes:
- id
- data-maildrip-apikey
- data-maildrip-accesssecret
- data-maildrip-campaignid
- data-maildrip-redirect-url (Optional if you want your users redirected to a specific url after submission)
must be placed within the webpage
- Inside the form element in step 5 above, input fields with these:
- class=”maildrip-newsub-name” to retrieve name
- class=”maildrip-newsub-email” to retrieve email
Core Scenarios for MailDrip Integration
A. Blog Pages
Placing MailDrip forms at the end of a blog post or mid-article is one of the most effective ways to capture subscribers. Readers who engage with your content are already primed to hear more from you, making this a natural moment to invite them to join your list.
B. Pop-Ups
Pop-ups, when used responsibly, can double or triple your opt-in rates. By embedding a MailDrip snippet into a BeeTcore pop-up, you ensure subscribers go directly into your drip campaign. You can even trigger pop-ups based on user behavior (e.g., exit intent, scroll depth, or time on page).
C. WordPress
If your site runs on WordPress, MailDrip integration is straightforward. Simply use the Custom HTML block to paste the snippet, or embed your custom form in widget areas like the sidebar or footer. For developers, the JavaScript method works seamlessly with custom themes.
Immediate Action Plan (For Brands)
1. Generate HTML Snippets inside MailDrip for each campaign.
2. Embed snippets into pop-ups with BeeTcore to maximize conversions.
3. Match branding by editing form styles or applying CSS.
4. For advanced setups, collaborate with developers to test the JavaScript + API method.
5. Track results and refine drip campaigns based on subscriber behavior.
Frequently Asked Questions (FAQs)
Q1. Do I need to know coding to use MailDrip integration?
No. If you’re non-technical, just use the HTML snippet method copy, paste, and you’re live.
Q2. Can I customize MailDrip forms to match my brand?
Yes. You can modify the HTML and CSS in snippets or fully control form design with the JavaScript method.
Q3. How does MailDrip work with WordPress?
You can paste HTML snippets into posts, pages, or widgets. Developers can use the JS integration for deeper control.
Q4. What if I want to track where subscribers come from?
Use attributes like source or tags in your forms to identify which blog post, pop-up, or page generated the lead.

Conclusion
Integrating MailDrip into your website is one of the smartest moves you can make to grow your audience and strengthen customer relationships. Whether you prefer the simplicity of an HTML snippet or the flexibility of a JavaScript + API wrapper, MailDrip gives you the tools to capture leads, run drip campaigns, and boost conversions.
Start small by embedding a snippet in your blog or pop-ups with BeeTcore. As you grow, experiment with JavaScript integration for advanced segmentation and tracking. Either way, you’ll be setting up your business for long-term success in 2025 and beyond.
Are you planning to start with MailDrip snippets or dive straight into JavaScript integration?
READ MORE: 9 LEAD NURTURING STRATEGIES TO CONNECT WITH YOUR CUSTOMERS